Attach a wooden veranda to the house options. Beautiful photos of the veranda and terrace to the house. Prices for various types of timber
There are a huge number of options for assembling and installing veranda extensions to a country house. But a more economical and simple option would be to assemble a frame structure. This extension will look advantageous next to a frame wooden house. What building materials and tools will be needed for self-installation and extension, and how this installation is carried out, we will describe below in our article.
 In the definition itself, it can be seen that the basis of the entire structure is the carrier, made of edged. In addition to the main frame, other parts of the frame construction are also made from timber - these are the lower and corner posts.
Standard racks and lintels are made from ordinary boards.
With the help of boards, both future and near the veranda are indicated.
In this case, the thickness of the racks is equal to the thickness, and the step width between the wooden racks is determined based on the width of the insulation layer.
For example, if a private house is located in the northern region, then the thickness of the insulation layer should be at least 15 cm. Based on this, we can conclude that the width of the lumber will be exactly 150 mm x 100 mm or 150 mm. The step size is observed within 60 cm, because the width of the insulation plate will be exactly 60 cm.
After assembly and installation of the frame structure, an insulating layer is laid. Before this procedure, it is necessary to carry out and. After the completion of the insulation work, the rough sheathing of the entire structure is carried out using DSP sheets.
The most common material for rough sheathing of the veranda is panel. This panel has a greater resistance to moisture and mechanical stress than other materials. All OSB panels have sufficiently high strength indicators. Below we will consider what other materials are used as cladding for a frame house and outbuildings.
Construction of a veranda for a wooden house
 Frame modern provide a certain number of options for installing and mounting the veranda.
In the west, a variety of methods and options are used that allow you to build not only extensions, but also small one-story houses. A novice specialist can easily choose a design option for his veranda: it can be frame-panel, or frame-frame construction.
The type of panel construction provides for the rapid assembly of existing panels that have window and door openings. The specifics of these works are more reminiscent of the assembly of a children's designer, because all the elements and parts are assembled and fastened together. These panels are produced according to individual orders, since their size must strictly match the dimensions of the filled one. But if you need to make an extension more complicated in terms of technology, then you need to use the frame-frame construction of the veranda.
The frame type of construction involves the assembly of panels directly on the site where construction work is carried out. Such technologies are in no way inferior to other construction options in terms of quality and reliability, as well as durability.
Frame construction was used by the Indians, and later it migrated to European and Western countries. During the construction of panel and frame type, it is not difficult to produce finishing. You will not need to wait for the shrinkage of building materials, and the work itself is carried out in any season and season. The most important advantage of frame extensions to a house is the presence of a thermos effect, i.e. heat in a reliable insulated house will linger several times longer than in ordinary residential buildings.
Instructions for installing a frame extension to the house
 Before you start building, you need to prepare all the necessary tools and consumable building materials. You will need the following items: bitumen, crushed stone, broken brick, concrete mix and gypsum mortar. From the construction you will need: an electric saw, a drill, a grinder, a sledgehammer, a hammer, a shovel and an ax.
At the first stage of construction, it is necessary to prepare for the extension of the veranda.
You can form it like this:
- you need to dig a pit into which a crushed stone pillow will be poured.
- Next, it will be necessary to install reinforced and form the formwork.
- After the finished foundation, pour a special mixture. Next, form a frame extension, install a strapping around the entire perimeter, with a width of at least 150 mm. You can also use wider bars, then in the cold season the house will be quite cool.
 After installing the entire corner posts, at least 15x15 cm wide. Small sizes can also be used, but for the quality and reliability of the frame extension to the house, we recommend using posts with the indicated types of sizes. Installation of all racks is carried out at the building level. The next step will be the installation of additional wooden racks around the perimeter. The step is 150 cm, and will depend on the thickness of the racks.
Before installing additional racks, you need to calculate where the plates will be. This calculation is done so that it is not necessary to cut the insulation panels. After that, the top trim is laid. It is mounted according to the same principle as the lower trim, with a release beyond the crown up to 30 cm.
After installing the strapping, a wooden one is installed on the upper crown, which acts as a wooden frame for roofs. Glassine is installed on the crate as a specific insulating building material. It is needed as a special safety net, which perfectly protects in case of leakage of the veranda.
Installation and installation of the roof of the veranda
 Veranda roof
 Roofing material for the veranda is chosen primarily based on financial capabilities. To date, the cheapest is a regular slate sheet 175 cm long.
Up to 30 sheets of this material may be needed on the roof of a small frame extension to the house. The exact number of sheets will depend on how wide the overlap will be. As a rule, laying is carried out with an overlap of 10 cm.
replaced with other building materials- Today the market offers a huge number of options. The most affordable option for roofing is the use of rolled roofing. But it can be used only in cases where a certain protection from moisture or cold is not required from the frame wooden extension.
Final stage of work
After installing the roof, you can proceed with the installation and. Initially, a draft floor is mounted, on top of which sheets of insulating building material or glassine are laid. Only after this procedure, you can engage in the installation and installation of the finished floor.
 Having completed the installation of the floor, it is possible to carry out the insulation of the veranda extension, starting from the walls. They are insulated in the same way as floors - first of all, heat-insulating sheets are laid, and only after that they are covered with glassine for special protection against moisture. Penofol can be used instead of glassine. After the wall insulation stage is completed, the ceiling can be insulated - all insulation panels are securely attached to the ceiling crate using self-tapping screws or special dowels.
After completing all the insulation work, you can safely begin finishing the walls and floors.
When finishing, the following building materials are used: platbands, fillets, plinths and flashings. Everything must be installed in the appropriate places.
When using the correct technology for mounting and installing the insulation layer and with the correct erection of the frame, the entire frame structure will serve you reliably and efficiently for a long time.
It can also be an ordinary frame extension to the house. It is worth noting that the structure itself is erected from various building materials. An extension to a country house from has a lot of advantages. One of them is a long service life. The extension performs various functions. If you need a place to relax, then the frame extension to the house will fulfill this desire. The extension is built on various types. But the best foundation will be considered both financially and qualitatively.
A veranda attached to the house is a great solution not only to increase the usable area, but also to transform the exterior of your home. Most designers believe that a veranda must be in every country house. After all, you see, it's nice to gather in it with friends and family members and have fun. It is only important to decide on the design of such an extension so that all family members are satisfied and guests admire the beauty of the veranda. Dekorin will tell you how to properly attach a veranda to your house and inspire you to build your own extension.

First of all, during the construction of the veranda, it is necessary to develop a project for the future premises, which will take into account all the nuances and features of a particular structure. It is known that the veranda insulates a residential building, which means it is logical to make it from the cooler (northern) side. Of course, if you plan to use the veranda for relaxing or cooking, you should make sure that the windows face exactly your site.


Often the veranda attached to the house serves as a hall. Therefore, where the entrance to the house is located, it is necessary to place a veranda.


Before planning the construction of a veranda, you should answer the following questions:
- which side do you want to see the extension;
- what type of veranda do you want (open or closed);
- where will the front door be?
- What materials will you use and how many will you need?
If you want to completely glaze the veranda, think in advance how you will ventilate the room so that there is no greenhouse effect in summer. They also often make windows with removable frames, which allow you to make an open veranda from a closed veranda and vice versa.

In order for the temperature in the room to be comfortable even in winter, its walls should be built from dense materials, and cracks and gaps in the enclosing structures should be avoided. Glazing is best done double.

It is optimal if the walls of the veranda are separate from the house itself. Thus, for the veranda it is necessary to make a separate columnar or strip foundation. It is not recommended to make a roof with a too steep slope. A variety of photos of verandas attached to the house can serve as examples for you and inspire you to build your own extension.
Also read:Inspirational verandas and terraces to the house, photos to them

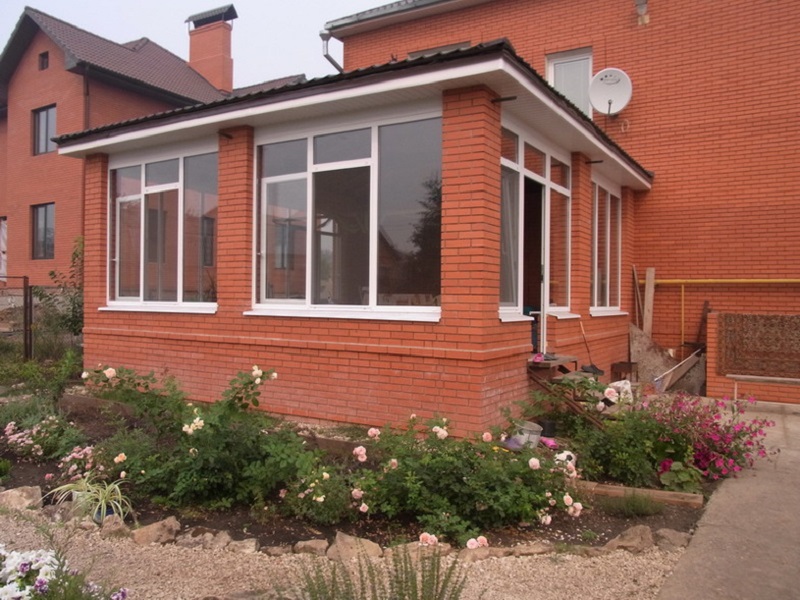
How to attach a veranda to a brick house: the main nuances
For such a building, first of all, you will need a stronger foundation, because brick is a rather heavy building material. The strip foundation is ideal, because it is characterized by increased strength. A veranda built of brick is a reliable room that can protect you from bad weather and give you home comfort. However, it should be borne in mind that if you do not have experience with bricks, you will have to turn to professionals for help. By the way, for the veranda it will be enough to lay half a brick, because if such a wall is also insulated, then the temperature will remain comfortable even in winter.


Red brick is the optimal material, which is often used for the construction of both closed and open verandas. Such a structure will combine the cozy atmosphere of the house and the beauty of the nature around you.


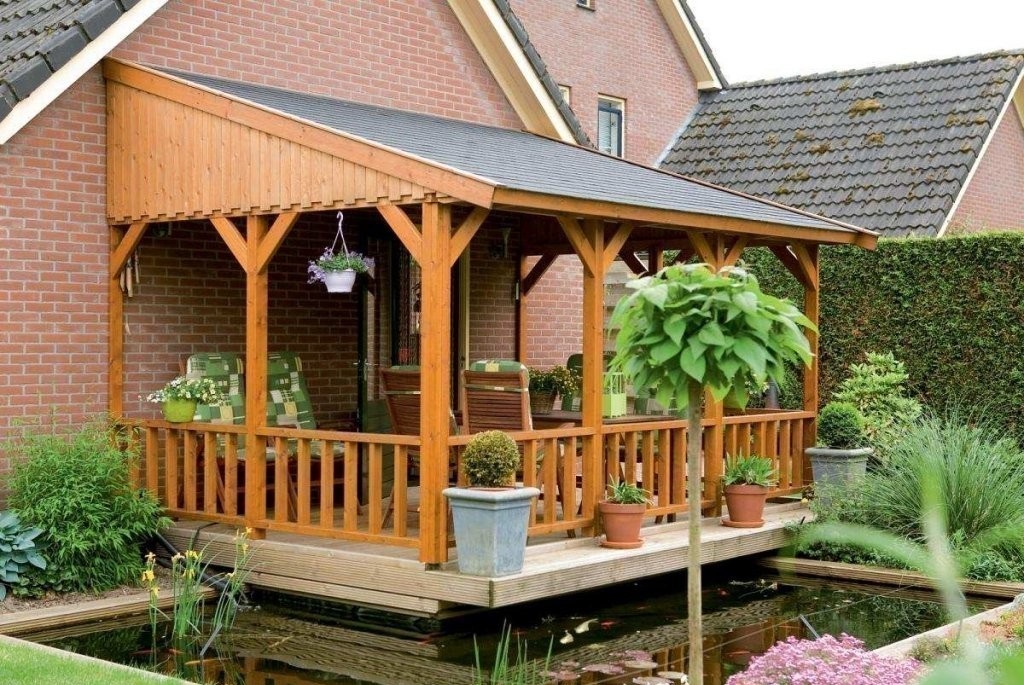
Veranda for a wooden house: photos of great ideas
The best option for a veranda for a wooden house is, of course, an extension made of wood. If you use not wood, but, for example, glass or other material, it may seem out of place and tasteless. A wooden veranda attached to the house will become a real embodiment of warmth and home comfort: you just have to try!

To add a veranda to the house, you will need a frame made of timber or metal, as well as large windows on the entire wall. For the usual summer version of the extension for the floor, durable materials are used, such as tile, board or stone. If you are making a closed veranda, it is allowed to use the same materials as at home (laminate, linoleum, etc.).

A great solution would be to install a fireplace under natural stone in a wooden veranda. So, wood and a stone fireplace will complement each other, because they are natural materials. A fireplace can not only decorate your veranda, but also warm you up on cold winter evenings. You can see photos of wooden verandas attached to the house, and choose the extension to which the soul lies.

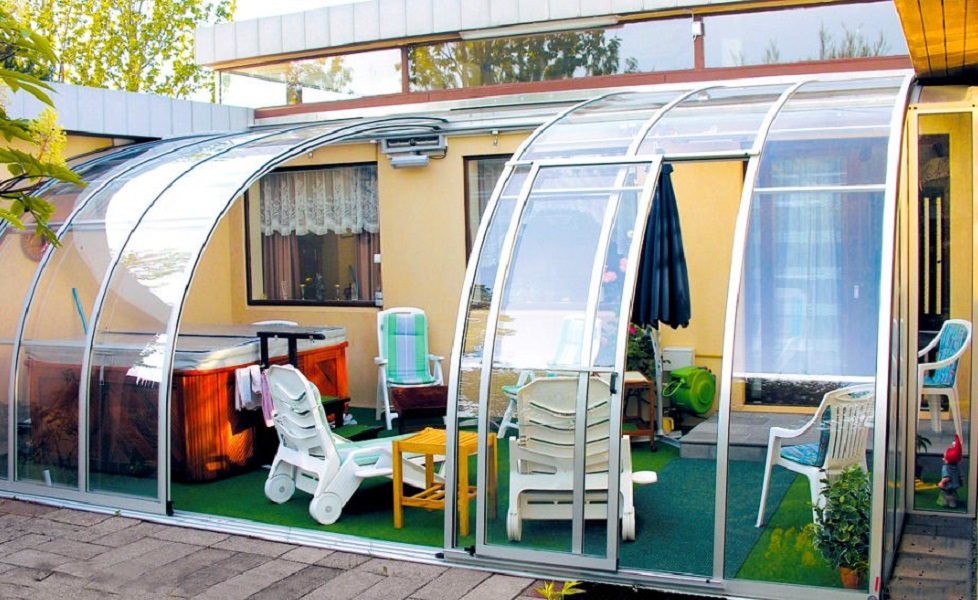
Polycarbonate veranda attached to the house: photos and construction features
The most unusual and at the same time inexpensive extensions are obtained from polycarbonate. So, this material will protect you from bad weather and dust, give a good view of nature, and also add comfort and aesthetics to the veranda.


Polycarbonate is quite popular, because it is transparent, and at the same time it can be of any color. This material is 200 times stronger than glass, which means that it is not afraid of falls and various loads. Sound and heat insulation also remain at a high level, which is good news. Polycarbonate is a flexible material, which means it can be used to build rounded structures.


If you need a simple summer veranda, an open polycarbonate extension is the best solution. On hot days, this material perfectly protects from the scorching sun, as well as wind and rain. If you competently approach the matter, then building a summer veranda will not be difficult for the owner of the house. So, with your own hands it can really be done in a few days.


A closed veranda attached to a polycarbonate house (as in the photo below) suggests the presence of window openings and doors. It makes sense to insulate such a veranda in order to calmly relax in it even in the cold season. By the way, windows are not at all necessary if you use transparent polymer sheets.


The arched extension looks very original. As mentioned above, polycarbonate bends remarkably, which means it can become a wonderful, and most importantly, unusual roof for your veranda. In such an extension, no doubt, there will always be enough sunlight.
Also read: 30 ideas for a stylish design of the veranda

Veranda attached to the house: 25 photos of interesting ideas updated: June 29, 2017 by: Svetlana Mezhenskaya
- First of all, you need to develop a project. And it doesn’t matter whether you build a veranda to the house yourself or hire a team of builders. In any case, a competent project will be the key to a successful and durable extension.
- After that, you need to take care of the legality of the building and obtain a building permit. To do this, it will be necessary to coordinate the project with the architect of the district administration. And after the construction is completed, register the modified house by contacting the BTI and the district architect.
- Unfortunately, without these documents, your veranda will be considered a self-construction, and you will not be able to sell, exchange, donate or even rent out the house.

Harmonious design of the veranda
The design of the veranda should match the style and design of the house. It should be its harmonious continuation. Usually, the attached veranda is made of the same materials as the house itself.
In wooden houses, it is made of timber or logs, in brick houses it is made of bricks. But this is not necessarily the rule. Wooden extensions to stone houses look very interesting.

They arrange the veranda along the main or end facade so that there is a door inside that allows you to get into the main room. The dimensions of the veranda depend on the wishes of the owners. Usually it is 3-6 meters long and 2.5 meters wide.

The foundation of the veranda is recommended to be made the same depth as the foundation of the whole house in order to avoid distortions. The frame is usually made of beams or logs. The walls and roof of the veranda should fit tightly to the house. The roof is often made shed and more gentle than the roof of the house.

Today, sliding walls have become very popular, so it is convenient in every way. By moving the walls apart, you can easily turn the veranda into an open summer terrace. The classic veranda should be bright, so large windows are installed on 2-3 sides. It is desirable that the front door is also partially glazed to give the extension even more lightness.

Most of the walls of the veranda have windows, so large furniture (cabinets, shelves, shelves) is placed against a blank wall. A table, chairs and sofas are placed at the windows or in the center. To save useful space, you can make a folding table attached to the windowsill. Since the veranda is a very sunny room, it does not hurt to hang curtains, blinds or straw curtains on the windows.
Veranda to the house - photo


Dining room, it is nice to have tea parties. You can build a veranda with your own hands using the tips from our article. We will tell you how to calculate the material, assemble the frame, etc. This will help you avoid mistakes, save time and money.
A veranda is an unheated extension to the main building, which adjoins the house on one side, combining the functions of a porch and a place to relax. Unlike a terrace, it is built in the same style as the house and serves as a shelter from rain and sun.
Veranda can be:
- with glazing (closed type);
- without glazing (open type).
The choice of materials for construction
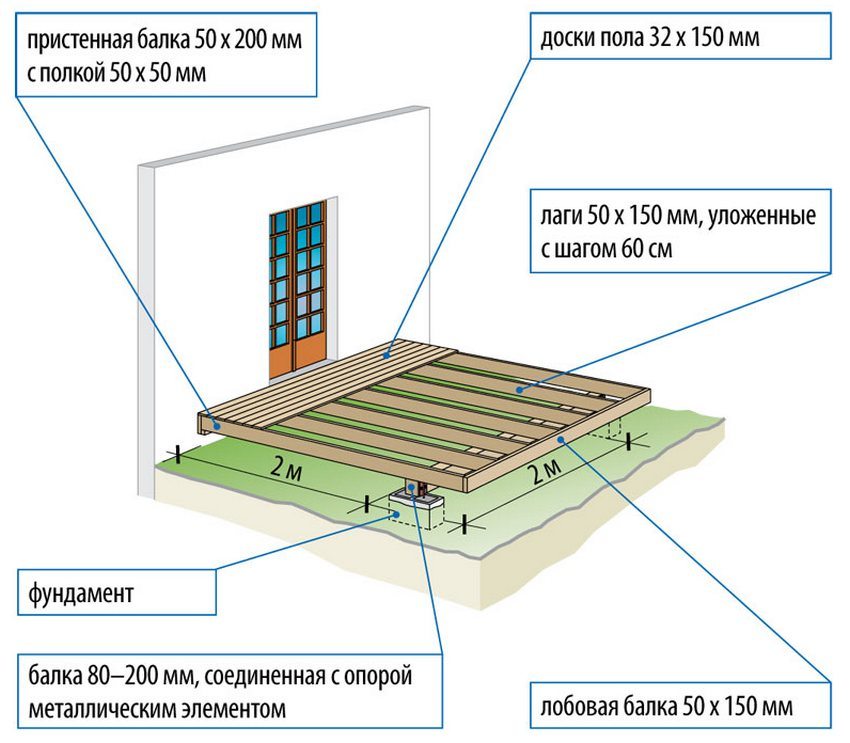
When choosing materials, one should proceed from the fact that the veranda is most often built according to the principle of frame technology. For racks, lower and upper strapping, a beam of 150x150 mm is used. It can also be used for the log floor. For the installation of the main floor trusses, a beam of a smaller section is needed - 80x100 mm. Intermediate rafters are made of bars 40x40 mm. Filling between the posts - from edged boards with a thickness of 20 mm or from vinyl siding.
It is necessary to build a crate, which will require a beam of a smaller section (40x20 mm) or a metal profile. Stiffening ribs from the same timber are installed between the uprights. The same beam is needed for the installation of roofing lathing. The ceiling is lined with 20 mm boards, moisture-resistant plywood or OSB boards. For the floor, a grooved board with a thickness of at least 40 mm is used.
In order to know the exact amount of basic materials, before starting construction, it is necessary to make a sketch of the future veranda, in which all dimensions will be indicated.
 Veranda model with basic dimensions
Table. Consumables for the construction of the veranda
| Material name | Unit rev. | Qty | Average price, rub. | Total cost, rub. |
| Beam 150x150 mm (pine) | m/n | 45/1 m 3 | 7 500 | 7 500 |
| Beam 80x100 mm | m/n | 20 / 0.24 m 3 | 7 500 | 1 800 |
| Beam 40x40 mm | m/n | 20 / 0.24 m 3 | 8 500 | 2 040 |
| Beam 40x20 mm | m/n | 16 / 0.01 m 3 | 8 500 | 85 |
| Grooved board 40 mm | m 2 | 8 | 640 | 5 120 |
| Edged board 20 mm | m 2 | 6 | 280 | 1 680 |
| Brick ceramic ordinary M-100 | PC. | 250 | 12,50 | 3 125 |
| bituminous tiles | m 2 | 10 | 460 | 4 600 |
| Ruberoid | roll | 1 | 250 | 250 |
| Cement | kg | 150 | 50 | 7 500 |
| Sand | m 3 | 2 | 120 | 240 |
| Wooden window block 1200x1000 | PC. | 8 | 4 400 | 35 200 |
| Wooden door block | PC. | 1 | 5 000 | 5 000 |
| antiseptic | l | 5 | 380 | 380 |
| The total cost will be | 76 920 |
The table shows the main materials. Some of them can be replaced, depending on personal preference, for example, vinyl or metal siding, wooden clapboard, or a variation of it - blockhouse can be used to fill between the racks.
Foundation for the veranda
For a light structure (which includes a veranda), the best solution would be to build a columnar foundation. This will significantly reduce the cost and speed up construction.
Particular attention should be paid to the base elements located at the entrance: they must be stronger than others. This requirement is caused by the need to prevent the veranda from tilting away from the house, which often happens when the foundation pillars subside. This can be avoided by building additional supports.
The construction of the columnar foundation for the veranda is carried out in stages:
- The site is being prepared: trees and shrubs are cut down, stumps are uprooted.
- The marking of the places of installation of the supports of the columnar foundation is being carried out.
- Pits are dug below the level of soil freezing (approximately 1.1-1.2 m), at the bottom of which sand bedding 150 mm thick is arranged. Sand must be moistened and compacted.
- Crushed stone is poured with a layer of about 100 mm.
- Crushed stone is poured with a liquid cement-sand mortar, after which concreting is performed on top of it. The concrete layer should also be about 100 mm.
- A roofing material is laid on top of the concrete in two layers (for waterproofing). Brickwork is being carried out: brick columns of square section (one and a half bricks) are being built. The height of the above-ground part should be such that the floor level of the veranda is slightly lower than the floor level of the main part of the house.
- All supports must be at the same level: this must be controlled with a water level.
- After the masonry is completed, the pits are backfilled. The soil needs to be compacted.
- Two layers of roofing material are also laid on top of the posts.
 The pillars of the column foundation must be at the same level
Attention! It is impossible to leave unfinished construction for the winter: due to spring heaving of the soil, unloaded pillars can be unevenly displaced. Fixing this will be difficult.
Frame construction and wall construction
First, we mount the lower trim from the beam (all connections are made only above the foundation pillar). The timber in the corners is joined half a tree and a spike is driven into a drilled hole with a diameter of 12 mm. To lay the log, grooves are hollowed out every 50-60 cm.

Racks must be installed strictly vertically. They are fixed with brackets and special corner connectors. For ease of installation, the racks are temporarily fixed with jibs. The racks closest to the house should be made higher than the ones farther away so that the roof slope is at least 7 °: this is necessary to ensure good rainwater runoff and snow melting.
The frame of the veranda will become stronger after installing the window sill beams between the uprights. The distance from the floor level is about 0.5 m (windows should be large).
The top trim is the same as the bottom. In it, grooves are hollowed out for the bars of the crate.
In the squares formed by the bars of the lower trim, uprights and window sill beams, diagonal elements are installed (crosswise), connecting them half a tree - they will additionally strengthen the structure. The walls under the window are sheathed on the outside with boards or other suitable material (siding, shield panels, etc.). A heat-insulating material is laid between the inner and outer skin - mineral wool (if the veranda is not used during the cold season, the insulation can be omitted).

Attention! Wood must be inspected and boards and beams with signs of decay and insect pests should be rejected. All wooden elements of the frame should be treated with an antiseptic agent, and after installation, paint should be applied.
Roof and floor installation
On top of the mounted crate, we lay sheets of moisture-resistant plywood or OSB boards. We use it as a roofing material: under such a roof it will be more comfortable during rain. A gutter should also be installed with a slope of 3-5 ° towards the water outlet.
For the floor, well-dried, planed tongue-and-groove boards with a thickness of at least 40 mm are needed. They are tightly driven together, leaving a compensation gap of 5-10 mm at the edges.

Note: in order for the floor to serve for a long time, the space between the foundation supports is not sewn up, or air vents (ventilation holes) are arranged.
After that, a porch is attached to the veranda, doors are installed and glazing is performed. Windows can be with single glass: this is enough to protect against rain and wind. Window frames with double-glazed windows are necessary if the veranda is planned to be heated (in this case, all cracks must be foamed and covered with platbands).
The last step is interior decoration. On the veranda you can install a table for tea drinking, if the area allows - you can install a dressing table and decorate with flowers and climbing plants so that you can comfortably relax on the veranda during the summer heat or rain.
The veranda attached to the house is not always included in the original housing project. But the situation is quite correctable and an additional site can be equipped after the completion of the main construction. Verandas differ in size, configuration and material of manufacture. Examples of drawings and photos will help you develop your own project, taking into account all related factors.
Design stage: what to consider
Drawing up a project before starting the construction of a veranda attached to the house will significantly reduce the risk of errors and the development of defects during operation. The main points that are discussed before the start of the arrangement of the veranda attached to the house:
- Location of the extension. Installation relative to the cardinal points significantly affects the operating conditions.
- Veranda construction. The attached platform can be open and closed.
- Arrangement materials. The walls of the attached veranda deserve close attention; the amount of costs for the design of the foundation depends on this.
- When designing, take into account soil condition, direction of precipitation, amount of snow cover. The indicators influence the choice of the supporting structure and the shape of the roof.
- After the project is completed, careful calculation of material consumption.
Attached to the house is a closed veranda in the photo below:


Location
When drafting an attached veranda, they take into account which side of the horizon it will go to. This largely determines the conditions for further operation. There are four main options:
- East. The maximum solar activity is in the morning, by lunchtime and until the end of the day there is a pleasant shade on the attached veranda.
- South. Ideal for a project where the extension will serve as a winter garden.
- West. If the owners of the attached veranda are in the soul of romance and like to watch the sunset during the evening relaxation, then this option suits them perfectly.
- North. An attached site on the north side of the housing is chosen in two cases: if the house is located in the southern latitudes and there is a need to equip the veranda in a cooler place or it is necessary to additionally insulate the wall of the main building.
The view that opens from the attached platform also matters. It is desirable that an attractive landscape extends before the eyes. It is unlikely that vacationers will want to admire a blank fence or a roadway.
The photo shows a simple veranda project and examples of finished structures:


closed or open
The closed type of extension is more practical. In addition to daytime rest or eating, the space is used for various purposes. Use cases:
- summer cuisine;
- winter Garden;
- study;
- place for sports;
- as a hallway.
Comment! Year-round operation implies high-quality thermal insulation of the walls.
The attached outdoor area is used only during the warm period. Advantages of the choice - the complexity of the construction process and the consumption of material are significantly reduced compared to a closed structure. Another advantage of an open-type veranda is the opportunity to spend more time outdoors. On a hot day, a light breeze will pleasantly blow over those present, although similar conditions can be provided for in closed outbuildings.
When arranging the interior, the choice of furniture and textiles deserves special attention. They must withstand the influence of adverse factors. The open veranda attached to the house is shown in the photo:

Material
The appearance of the extension is determined by the material of the walls. In order not to disturb the harmonious exterior of a residential building, experts recommend organizing construction with similar materials. But a lot depends on the project and deviation from the rules is quite acceptable.
There are several arrangement options:
- Brick. Ideal for capital housing, if there is a need for a warm extension.
- Tree. It will come in handy in a wooden frame.
- Sheathing the finished walls with siding will be a logical continuation of the main building with an identical finish.
- Polycarbonate. Involve if lightweight construction and quick installation are required.
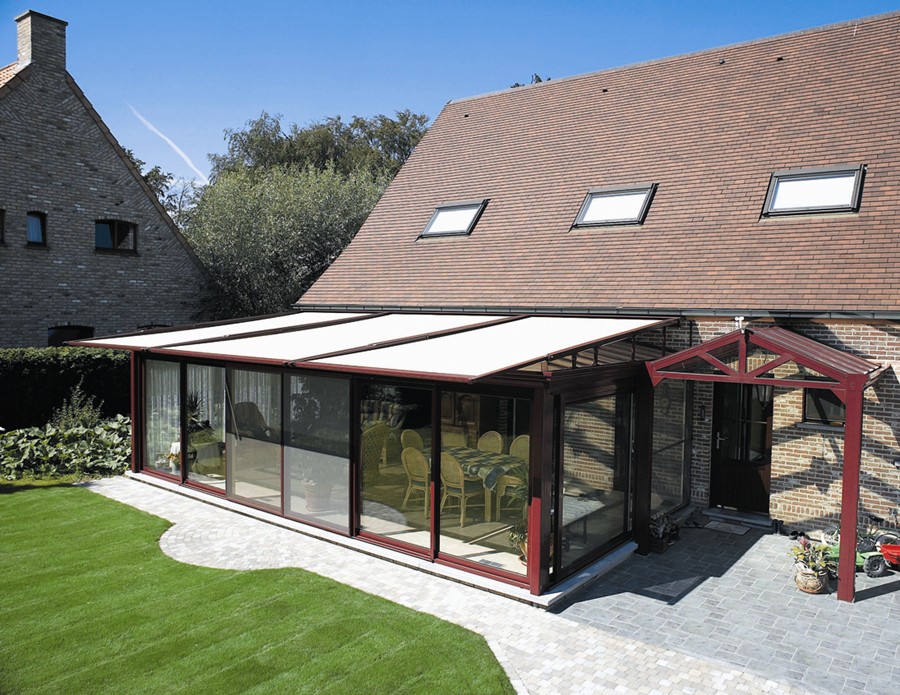
- Glass. Extensions, the walls of which are glazed to the floor, look very aesthetically pleasing and seem airy.
As a roofing material is taken, similar to the roof of the main building. There are projects where the entire frame of the veranda is sewn up with polycarbonate. Unusually beautiful both outside and inside, look verandas made entirely of glass.
The photo shows a summer veranda attached to the house:
Dimensions and configuration of the extension
The parameters of the attached site are one of the key points in the drafting of the project. It largely depends on the size of the house itself. It is illogical to attach a large terrace to a small dwelling or vice versa. The construction budget also plays a role, an increase in dimensions proportionally entails an increase in the cost of arrangement.
Comfortable dimensions for operation vary within the following limits:
- length from 4 to 5 m;
- width from 2.5 to 3.0 m.
If the owners of the house are hospitable hosts and large companies are not uncommon for them, the attached area can reach 7 m in length and 3.5 m in width. Doing more is not practical.
Attention! Heating in large rooms is usually not planned.
The traditionally attached veranda has a rectangular shape. This is due to a simpler project and construction conditions. Sometimes, if the area of \u200b\u200bthe adjacent territory allows and there are no restrictions on the construction budget, they choose the hexagonal configuration of the attached veranda. One of the options for the project is shown below in the photo:
During the drafting of the project, they work out the design of the stairs, the size of the windows, the shape of the roof and the type of foundation. The depth of the foundation of an attached veranda with a large weight is usually located at the level of the main building. The extension walls remain independent of the main structure. The roof is most often made single-pitched. Arrangement of the floor of the open veranda comes with a slope of about 20 mm per 1 m of width towards the site. This measure will prevent the accumulation of liquid during precipitation with strong winds.
The verandas attached to the house, shown below in the photo, can serve as an example for your own project:


Characteristics of brick verandas
Practicality is characterized by a building built of brick. The main advantages of the solution:
- Long-term operation without regular preventive maintenance.
- The ability to carry out external finishing in accordance with the exterior of the main structure, whether it be decorative plaster, artificial stone or siding.
- With a high-quality initial design of external walls, it does not require subsequent maintenance.
- Operation of the attached covered veranda in winter, subject to the availability of heating.
- A wide range of finishing materials for interior design.
To preserve heat during the cold period, a closed veranda is built with thick walls; heat-insulating material is used when decorating the roof. An attached summer playground is enough for laying in half a brick.
Attention! The severity of the brick attached structure makes it necessary to take care of the construction of a strip foundation.
The binding of the attached new veranda to housing is not made rigid. Docking seams are sufficient to fill with mounting foam. When the attached structure gives a landing, you can proceed to a thorough design of the seams.


Features of wooden outbuildings
The projects of wooden verandas attached to the main building look interesting. The solution is especially relevant for timber houses. Material advantages:
- Environmental Safety.
- Ease in processing.
- Variability of the configuration of the attached structure.
But the tree requires some preparation before construction and during subsequent operation. To extend the life of an attached veranda made of capricious material, pre-impregnation with protective compounds and periodic renewal of the protective layer, whether it be varnish or paint, will help. The construction of the veranda frame is carried out using a beam with a section of 80x120 mm or 100x200 mm. Sometimes they are replaced with logs with a diameter of 120 mm.
Depending on the exterior of the house, the stylistic decision of the attached structure is chosen. Will it be a laconic structure or a veranda decorated with ornate balusters on the railing.

Wood is a sought-after material for decorating outdoor attached areas. The fairly light weight of the veranda allows you to get by with a columnar foundation. The material for the floor in this case is selected moisture resistant. Among the possible options:
- deck board;
- stone;
- tile.
The last two options significantly increase the weight of the attached structure, which should be taken into account in the project when developing the foundation.
For attached closed-type verandas, the usual flooring in the form of linoleum or laminated boards is suitable. If you plan to use the attached structure in winter as a living room, a fireplace will look very impressive in the interior. In this case, it is important to think over the fire safety system, because the tree is extremely susceptible to high temperatures.


The practicality of polycarbonate
Arrangement of a private plot is rarely complete without polycarbonate. Projects of attached structures made of polycarbonate are a familiar and common phenomenon. The reason for the demand lies in the numerous advantages of the material. Among them:
- High strength. Compared to glass, this figure is 20 times higher.
- Operational safety. Even if the integrity of the attached veranda is damaged, the risk of injury from fragments is minimal.
- High light transmittance. Inside the polycarbonate veranda, there will be enough natural light, but at the same time, direct sunlight is scattered and UV rays are partially absorbed.
- Flexibility. Projects of attached structures using polycarbonate often offer designs with smooth lines. You can bend the material at home immediately before mounting the attached veranda on the frame without the use of special equipment.
- Operation is possible in the temperature range from -40 to +100 °C. Therefore, the attached structure will maintain integrity in severe frost and in the hot sun.
Important! The absence of the need to equip the foundation is one of the key advantages of projects where the attached site is framed with polycarbonate.


Aesthetics of glass
A closed attached structure is not complete without glass. Depending on the purpose of the extension and the seasonality of operation, glazing can be performed in one layer. In this case, it will protect the interior from wind, debris and precipitation, but will not retain heat. Double or triple glazing is capable of maintaining heat in the cold.
An attached closed veranda is recommended to be decorated with windows with the possibility of ventilation. This will eliminate the greenhouse effect during the hot period, especially if the structure faces the sunny side. Practicality is distinguished by projects where the frames are removable. In this case, a closed attached structure is easily converted into an open area.
Sometimes among the projects there are structures where glass completely replaces the walls. There are several arrangement options. These can be aluminum profiles and single-layer glazing or heavy plastic frames with a triple package. The choice depends on the planned operation of the attached site. In the first case, it is seasonal, in the second case, when arranging heating, it is possible to be on the veranda in the winter cold.


Frameless attached structures and sliding structures look unusually impressive. The cost of such a project is higher than standard offers, and the practicality is lower. This option is more suitable for warm regions or very wealthy owners who have enough other real estate for winter holidays.

Conclusion
The variety of materials when choosing an attached building project allows you to create a unique recreation area, whether it is an open summer terrace or a reliable closed-type veranda. The study of related factors will help you make the right choice. The proposed drawings and photos will become a guide when drawing up your own project.