Ornament for carving on wood. Wood carving for beginners - create unique wood products with your own hands using video master classes. The nuances of creating templates on your own
House carving is a beautiful and practical solution for interior and exterior decoration. Carving was intended to decorate one's home outside and inside with the help of carved items. With the help of a carved facade you can make your home festive. All protruding and overhead elements of the house's facade were decorated with carvings: cornice, platband, piers, porch pillars, roofs.


Types of technology
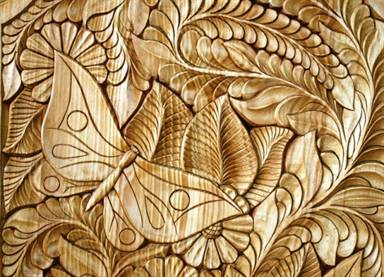
There are the following types of house carvings: relief, flat-relief, contour, slotted. If you need to decorate a table, mirror frames, or a closet, you should choose a blind relief carving. It has the appearance of a relief pattern and is performed on a blank background. When performing, floral ornaments, images of mythological creatures and animals are used. In the photo it looks like this:

Flat-relief carving is a “relief on a plane”. It is characterized by deepening or removing the background around the ornament by 5-7 mm. The image will be three-dimensional. Using the flat-relief carving technique, compositions depicting people, birds and animals look great. This type is very popular for bath themes.

Contour carving is characterized by the contouring of images. This is one of the simplest types of carving. It is used to decorate dishes, cutting boards, and household items. In contour carving, figurative motifs are used: flowers, leaves, animal figures.

Openwork carving was used to decorate railings, stairs, trim, doors, etc. This is the youngest type of carving, approximately 150 years old.
Operating procedure
- We are preparing a rough sketch of the house;
- We calculate the required amount of material, select the type of material and prepare boards of the required size;
- We make the necessary templates for house carvings. To do this, you should think carefully about the ornament; the elements of the composition must certainly be repeated;


- Prepare machines for carving.

You can’t start carving without becoming familiar with its technique. You need to start with the execution of geometric patterns.
Templates can be made to order by a craftsman. For this purpose, provide your sketch, drawing or photo. Many craftsmen make their own tape stencils for carving.


Making a template
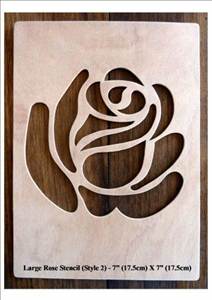
Ready-made templates are used to make platbands. They can be found freely available on the Internet. You can make the template yourself if you can’t find the option you need:
- We select a suitable drawing;
- We transfer the contours of the pattern onto tracing paper. To do this, use a ballpoint pen or a soft pencil;
- If you need to enlarge or reduce the picture, use the grid. We transfer the contours onto tracing paper. We divide the image field into squares and number each one. On a cardboard sheet or thick paper there should be the same number of squares with larger or smaller sizes. The selected image must be redrawn into a new grid;
- Using carbon paper, transfer the drawing onto a wooden blank.
The template can also be made from plywood.
Features of the method
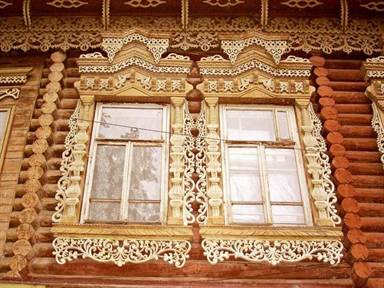
If we drive through the Russian outback, we will definitely see overhead elements of house wood carving on the facades of houses. Since pagan times, there has been a tradition of decorating the exterior with carved patterns. Nowadays, it has regained its relevance.


Russia has always been famous for its timber reserves and its forests. Therefore, most of the houses and outbuildings were built from high-quality wood, and many of these houses still stand today.

- Hand tool
- Jigsaw
- Preparing the stencil
- Sawing process technology
- Defects in work
Wood carving with a jigsaw is rapidly gaining popularity: many people want to purchase an interesting decorative item to decorate their home, furniture, and even clothes! Carved objects of various thicknesses fit organically into any interior style; people often purchase photo frames for photographs with ornaments, cut-out words and letters, or order intricate shelves and other interesting products. Few people know that artistic cutting out of plywood with a jigsaw is a task accessible to anyone, even the untrained and inexperienced. You just need to understand how to work with the tool.
What is a jigsaw: general description
A jigsaw is a tool designed for cutting various contours from plywood, including curved ones. It is equipped with a blade with fine teeth that can make an even cut of plywood without the formation of significant burrs.
Hand tool
The ancestor of this type of tool is a manual jigsaw. It consists of a metal arc in the shape of the letter “U”, between the ends of which a sawing blade is stretched and attached to clamps. They securely hold the file during operation and allow you to adjust its tension. On one side of the frame there is a handle.

The clamps on the tool can rotate, creating different planes for sawing, thereby providing the opportunity for wood carving of varying complexity.
When cutting from plywood with a hand jigsaw, you need to be careful: its design is quite fragile, and during intensive work, the blade often breaks from force and heat, so it has to be replaced. To do this, each master must have several dozen spare files.

When working with a jigsaw to carve internal contours, it is convenient to use such an auxiliary board as in the photo: it will help both protect the table and solve the problem of convenient placement of the workpiece.

Jigsaw
The tool operates from an electrical network. It is a housing in which the working mechanisms are located, and there is also a handle for control on it. The sawing organ is located in the lower front part. The blade is often protected by a foot, which allows you to cut the contour exactly along the line without deviation. Advanced and professional jigsaw models have various attachments that facilitate the cutting process and straighten the edges of plywood.

Blades can have different teeth in shape and size. It is necessary to select saw blades that are appropriate for the material being processed so that damage and damage to the plywood sheet does not occur during operation of the mechanism.
Classification of jigsaws by power and application:

The instructions on how to use a jigsaw, or the technical data sheet, should describe the main parameters of the tool that must be taken into account when using the mechanism.
Wood carving tools
Sawing with a jigsaw is a creative process, but it requires preparation and additional equipment. What you will need for work:

Preparing the stencil
Drawings for cutting with a jigsaw can be of different sizes, depending on the scale of the product being manufactured. To create a diagram of a shelf, a piece of furniture or a composite three-dimensional toy, you can take a large sheet of whatman paper A1 or A0; wallpaper left over after renovation will also work; for small figures, use regular A4 paper or another suitable format.

Using a bright pencil or marker, draw the outline of the future product on the surface, following the dimensions. This could be an element for assembling furniture, a shelf or another large product.

There are such a wide variety of templates for cutting with a jigsaw that it can be difficult to choose the right one. It is much easier to come up with your own cutting patterns and transfer them to paper.

Transferring an image to the surface of plywood or boards
Before you start cutting with a jigsaw, you need to transfer the image from the stencil to a piece of wood or plywood. To do this, cut out a shape from a sheet, apply it to the surface of the plywood and carefully trace it. It is desirable that the line be smooth and accurate. We use a simple pencil so that, if necessary, we can correct the line by erasing it with an eraser.
We apply the outline from the back side so that no remaining lines are visible on the finished product. The internal area can be shaded so as not to cut off excess and to mark untouchable areas.
It is important to transfer the design in such a way as to minimize cutting along the grain with a jigsaw - it is so difficult to get an even line.
Sawing process technology
Many people have probably heard how to use a jigsaw. Working with the tool will not cause difficulties if you prepare for it correctly.

Plywood carving begins with the inner contours of the design. To do this, you need to make slots for inserting the tool blade:
- The plywood is often taken thin, and when cutting a large contour there will be no problems, but tension may arise in a small remainder. Sawing with a jigsaw inside can damage the product - chips, burrs, cuts;
- It’s easier to work this way: you always have something to hold the workpiece by. A large sheet is much easier to handle than trying to hold a small sawn piece while shaping its interior.
How to saw with a jigsaw:

Working with a jigsaw is much easier than using a hand tool; there is no need for physical effort and the process goes faster.
How to saw with a jigsaw:

As you can see, there is nothing complicated in this process.
Defects in work
If you did not follow the technology or hold the tool incorrectly, the saw may simply move off the line. Why does a jigsaw cut crookedly:
- tilted the tool while working;
- the tension of the file has weakened;
- With an electric saw, the fastening of the saw may become loose.
To avoid such problems, before starting sawing, be sure to check the tension of the saw and the fastening of all working elements. If the blade is beveled and stuck, it is better to start over and make a line parallel to the defective one.

A little about safety
Safety precautions when working with a jigsaw for cutting plywood and wood are simple:
- Use protective equipment - glasses, gloves, gown. These things will protect you from dust and small chips.
- Sawing with a hand jigsaw should be done carefully so as not to damage your fingers with the saw. Maintain a distance between your body and the tool.
- If you are a beginner, carefully read the instructions on how to use a jigsaw and the main characteristics of the tool. This information will help avoid accidental injury and unit breakdown.
Wood carving with a jigsaw requires care and attention. Both your health and the integrity of the finished product depend on these qualities.
What can be made from plywood: interesting ideas and drawings
Sawing wood with a jigsaw or hand tools is a creative process. You can create many decorative products of different directions:

Drawings of plywood crafts do not have to be made in exact dimensions. Even taking an example from the Internet and changing its proportions, you will get a unique product that no one else has in this form.
DIY plywood crafts can be painted or left in a natural color; you can glue buttons, beads, ribbons and other decor onto them to liven up the product. To do this, it is worth involving children in the work; their imagination is a bottomless well of interesting ideas.

We offer you diagrams with photos for cutting out of plywood with a jigsaw.
You can come up with your own idea of what you can cut using a hand or electric tool, make your own sketch and transfer it to paper, then to a piece of wood or plywood.
Carving plywood with a jigsaw requires certain knowledge and skills. If you don't have them, consider the following rules:

When decorating a living space, you can use a variety of materials, but traditionally wood is used for these purposes. Today, artistic processing is carried out using a huge number of techniques, but, perhaps, the most spectacular results are obtained when using slotted wood carving.
The technology cannot be called complex, but the resulting products amaze with their beauty and elegance. We will talk about this technique in more detail later.

What is a carving?
Through drilling and cutting through any background is the essence of openwork cutting. Upon completion of the work, light and airy patterns are obtained. There are through and overhead thread options. The first option creates the desired effect when illuminated, the second involves overlaying it on some background (base).


To make through cutting through wood, drills, special chisels, and files are used. The most suitable tool would be an electric jigsaw, which allows you to quickly and easily complete almost any design.

The work process itself requires the presence of pre-prepared drawings for slotted threads. Therefore, we will briefly consider some of the steps that are important to go through at the preliminary stage.

Preparatory stage
For those who are doing carving for the first time, it makes sense to focus their attention on theory. Printed publications and handicraft websites will provide comprehensive information about the decoration method in question.

After studying the technology, it is worth preparing the tools and, if necessary, purchasing them in the store. In addition to a jigsaw, you may need chisels of different sizes, drills and bits, cutters, consumables for grinding, etc.


Another important milestone at this stage will be the choice of patterns and sketches of the future decoration. You can try to do the latter yourself or find suitable ones on the Internet; fortunately, there are plenty of specialized sites on this topic. Printing to the desired scale will complete the preliminary stage.

Wood
The main requirements for the material are its dryness and quality. There are many blanks in specialized stores dedicated to handmade work. Suitable wood can be found in hardware stores and sawmills.

In addition, you can make good money at furniture factories, where there is always a large amount of unnecessary scraps available. Another possible option is used boxes and pallets.

The quality of work depends not only on the craftsman, but also on the species and type of wood. Each has unique properties, which is important when you have specific creative goals. Let's take a brief look at some material options.

Pine is the most accessible and inexpensive species. However, it is suitable only in rare cases. There are several reasons: resinousness, different density of layers, noticeable texture, which interferes with the creation of small patterns.

Aspen is considered a soft material and is not suitable for a beginner. It is easy to cut, the wood wrinkles and requires a lot of experience to work with it.

Birch and linden have an excellent structure and have the required density, which makes it possible to realize even the most daring sketches of slotted carving.


Plum is excellent due to its flexibility in processing, at the same time it has the required hardness. Small patterns and women's jewelry made of plum will become an excellent product in the hands of a master. Beginners should also try this material.

To avoid subsequent cracking and warping of the slotted product, it is important to remember to keep the material dry. Random drying in a warm and well-ventilated room will be the most optimal way. The boards are placed on their ends and on dies to ensure air access to all sides.

Creative process
Woodworking begins with transferring the design to the workpiece. For this purpose, all templates were prepared at the preliminary stage. When the drawing is applied to the part, the stage of drilling holes next to the drawn lines begins.


The drill should be of such a diameter that a jigsaw file can easily fit into the resulting hole. Where it is not possible to make cuts with a jigsaw (the pattern is too small and sharp bends), use a narrow hacksaw blade.

Experienced craftsmen advise using saws with fine teeth, otherwise the edges of the slots will have a ragged outline and the product will lose its aesthetics. It is advisable to drill with feather drills, having prepared a thin hole in advance.

Gluing thick paper to the back of the workpiece helps prevent torn edges when cutting through plywood. For beginners, it is better to try simple patterns with large details and a minimum number of corners.

Finishing
The product is processed to obtain smooth and clean edges. Use chisels; a sharp knife is useful in hard-to-reach areas.

Cleaning is carried out using sandpaper, a needle file or an abrasive wheel. The finished product is sanded on both sides until the proper appearance is obtained.


Looking at the photo of the slotted carving, it becomes clear that the resulting patterns are an excellent decorative element for furniture, window trim, and cornices. The elegance of the product makes it possible to create excellent women's jewelry, decorate screens and much more.

Photo of slotted thread


Interested in wood carving for beginners, as a rule, people who do not have an artistic education. For them this art is a hobby. Due to the fact that the knowledge of most of these carvers is scattered, we will try to organize it. There is nothing complicated about wood carving itself. In Russia, this type of creativity has always been the main one. Even in stone processing, at first they used techniques that they had long been accustomed to.
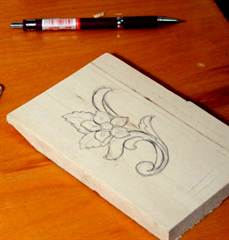
Applying a pattern to a wooden piece
Today this type of art is of genuine interest, despite the fact that many skills are already being lost.
Generally speaking, wood carving can be classified as a plastic art. Traditionally, a distinction is made between relief and. A novice carver should first master the techniques of creating relief.
This technique has several thread options:

The list doesn't end there. There is still a lot left outside the scope. From the names you can understand how this or that performance technique differs. Classification is often complicated by the fact that our country is large. In different regions, the names of the same equipment may differ. However, the essence does not change, so we will outline the general working methods.
All beginning carvers are introduced to geometric carving. She is simple but beautiful. This type of carving is divided into three types:
- contour;
- triangular-notched;
- nail or staple.
For execution you will need:
- linden board;
- blunt knife;
- Ruler and pencil.
Drawings in the form of a geometric pattern are applied to the board. The carver can come up with his own or copy the one he likes. You don’t need to immediately take on complex elements if you don’t have the skills and your hand isn’t strong enough.
 Several ornaments for wood carving
 The board should be smooth. This surface is achieved through planing. Under no circumstances should you sand the surface with sandpaper. If abrasive particles remain in the fibers, they will prevent the threads from becoming clean and neat. In addition, the cutting edge of the knife will become dull faster.
Beginner carvers are recommended to choose hardwood to make geometric patterns.
They allow you to draw straight lines with a knife. Creating straight lines on softwood boards is much more difficult. So, the tip of the knife cuts vertically into the surface. Depth - 1.5-2 mm. Then the entire line is cut, pull the knife towards you. In this case, the blade tilts at an angle of 40°. Movements should be smooth. Note that you need to start and finish carving the line with the tip of the knife. 
Having made one line or cut, we make the next one. Only now the blade should be tilted in the opposite direction. The chips will separate, and a geometrically shaped depression will appear on the board. If the edges are clear and the surface is shiny, then everything was done correctly. Gradually we cut out the entire element, and then the entire ornament.
Read also
Hand carved wood furniture
It must be remembered that the knife goes easier along the fibers. When cutting through cross fibers, you have to apply more effort. Your hand may slip, and here you need to know the rules:
- work safety;
- organization of work space;
- tool preparation.
Carver's workplace
Work with sharp tools should be carried out at a workbench that meets all the requirements for stability and strength. If it is not possible to make such a workbench, you can limit yourself to a tabletop. It can be of any size, but the height should not be higher than the level of the carver’s belt.
The countertop should always be smooth and clean. Often, while working, the knife slips and hits the table. Jagged edges form and need to be removed. Professionals always monitor the condition of the workbench surface. They do not recommend hammering nails, chopping with an ax, or throwing a sharp tool onto a workbench, as all this can damage the countertop. The board on which the ornament is cut is carefully secured with clamps. Working on your knees or on an unstable table or stool should be avoided.
 An example of a carver's workplace
 The workbench for wood carving should be well lit. You can install it near a window. However, there is little daylight.
If there is only one light source, dull dark shadows appear, which interfere with making the carving clean. Therefore, 2-3 more lamps are installed above the table.
They should illuminate the work from different sides, especially if it is dark outside the window. The lamps must be installed above the carver's eyes. While working, your eyes feel strained. Even experienced craftsmen notice this. A novice carver gets tired faster, and high-quality lighting makes the working conditions comfortable and safe.
Tool requirements
Modern ones open up wide opportunities for artists. They are used successfully in wood processing. But we will consider a tool for manual work.
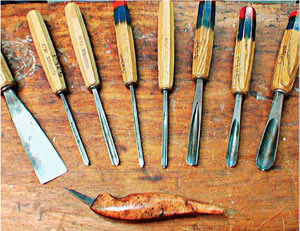 A selection of chisels for wood carving
 After all, gaining the skill to work with such a tool is more important and more difficult.
The master always has in his arsenal:
- saw;
- hand drill or brace;
- plane;
- semicircular and flat chisels;
- knives of different sizes;
- small axe.
Many manufacturers have already taken care of cutters and are creating a variety of sets. It is impossible to unequivocally assess their quality and benefits. There is some debate about this. Let us only note that not a single professional master has such a set. All tools are purchased separately and finished by hand.
The presented wood carving lessons will introduce beginners to this craft so that you can create objects from natural materials with your own hands.
History of the craft and types
Wood carving is a type of decorative and applied art that originated in ancient times. In Rus', wood carving was called carving, and the drawing performed using this technique was called marking, patterning, or vyzoroche. In this technique, craftsmen made braids, teeth, grooves, crowns, mushrooms, etc. on a flat surface. You can see such examples in the Assumption Cathedral, visiting the royal place.
Russia owes the development of wood carving to the monk Ambrose, a novice of the Trinity-Sergius Lavra, who at the end of the 15th century in his works combined Russian ornaments with Western and Eastern ones.
In 1660, craftsmen decorated the royal dining room with German carvings, which were figured, with Gothic motifs. Thus, elements of German appeared in Russian carving, including new tools and terms.
Thread types are conventionally divided into:
- end-to-end;
- deaf;
- brownie;
- sculptural;
- carving with a chainsaw.

Here's how they differ:
- Through threads are divided into overhead and through threads. This includes slotted carving, when through sections are cut with cutters and chisels; and profile threads, where such areas are cut out with a jigsaw or saw. If these types of carvings are made using relief patterns, then they are called openwork.
- If there is not a single through hole in the processed wood, such a thread is called blind.
- The facades of the buildings are decorated with house carvings.
- Sculpture is one of the most complex types of carving and requires great skill. Animal figures and human sculptures are made using this technique.
- Using carving with a chainsaw, they perform global work. This requires strength, so it is more suitable for men, while other types of carving can be successfully mastered by women.
Tools for woodworking, cutting blanks
Beginners can use only 2 tools - a well-sharpened penknife and a blunt knife.
When you learn how to perform simple elements with them and want to improve, then you can buy woodworking tools, for example, such a set.

There may be even more tools, but such a quantity is needed only by professional carvers performing complex work.

See what types of recesses you can make with semicircular cutters of different sizes, sharp-angled ones.

But what set of tools should a cabinetmaker have in order to perform the following types of woodwork:
- carving;
- sawing off;
- splitting and trimming;
- planing;
- turning;
- chiselling.

- Pay attention to the cutters that are used for manual turning of wood. In addition to the semicircular, there are also flat oblique, angular, cut-off, beveled, corner, etc.
- Saws are used to saw off the workpiece. They can be transverse, longitudinal, universal. The teeth of rip saws are chisel-shaped; at the transverse ones they are triangular and sharp. Universal ones are equipped with teeth that have a right angle. Such a tool can cut fibers both lengthwise and crosswise and at an angle. Each of these saws can be hacksaws, simple, one-handed.
- If the workpiece is made from a ridge, timber or trunk, then axes or cleavers are used. An adze is a type of axe, the blade here is located perpendicular to the ax handle, and is used to create shaped and concave products.
- To remove chips from the workpiece, turning or hand tools are used; planes can be used.

The most popular carving tools are chisels. Typically they consist of:
- steel rods;
- cutting blades;
- shank.
- Wide and straight are used for cutting or cleaning smooth or convex workpieces.
- With round blades - for working with horny knots or hardwood.
- With the help of narrow saws, the workpiece is processed in narrow places.
- A chisel with a thick steel rod is used to clean a deep cavity or workpiece with a hollow. Deepen the chisel into the wood using a mallet.
- Cranberries are used to make gutters of various depths and radii.
- Using corner chisels, grooves and triangular recesses are made.
Wood carving: sketches and master classes
After you have learned a lot of useful things and acquired what you need, let's try to cut out a flower. To make it you need the following:
- flat wooden blank;
- pencil;
- transparent paper;
- v-shaped corner chisel;
- narrow and wide semicircular chisels.
If you don't yet have a v-shaped chisel, you can use a sharp knife for this pattern.
Place a piece of paper on the screen and redraw the diagram.

Then transfer it to a piece of wood. Start by trimming along the outline of the center circle, then cut toward the center of the outer circle using a large semi-circular chisel.

Mark the flower petals.

Using a v-shaped chisel, cut along the outline of the petals.

Using the same tool, remove excess wood between the petals (“triangles”).

Take the next woodworking tool in your hand - a semicircular chisel - to cut out the outer contour of the petal. At the same time, it will look like the top part of a heart.

Using a large semicircular chisel, make cuts inside the outline of the petal.

Using a small semicircular chisel, make two cuts on this outline from the center of the flower.

To increase the cutting area, cut again.

Unfold the chisel and round the center of the flower.

Now you need to take the next carving tool - a v-shaped chisel and make these cuts in the center of the flower.

That's it, you can admire the result of the work.

If you want to carve a fox, the following sketches will come in handy.

If you want to make butterflies, the wood carving sketches included will also help you.

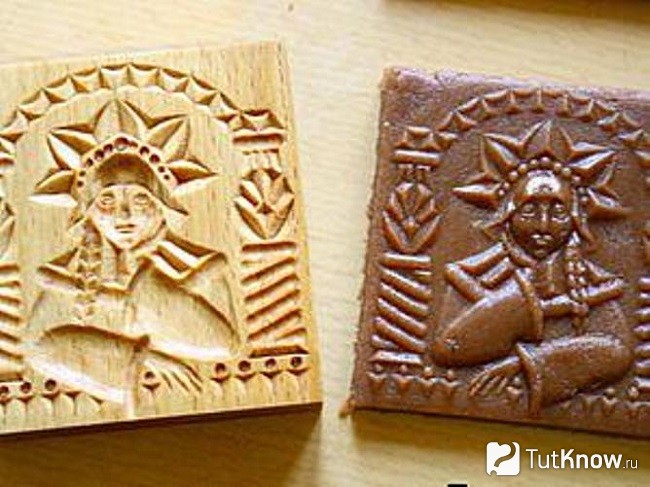
If you want to make a mold for printed cookies with the image of the Snow Maiden, then prepare:
- beech board;
- ruler;
- jigsaw;
- a simple pencil;
- ruler;
- sandpaper;
- eraser;
- linseed oil.
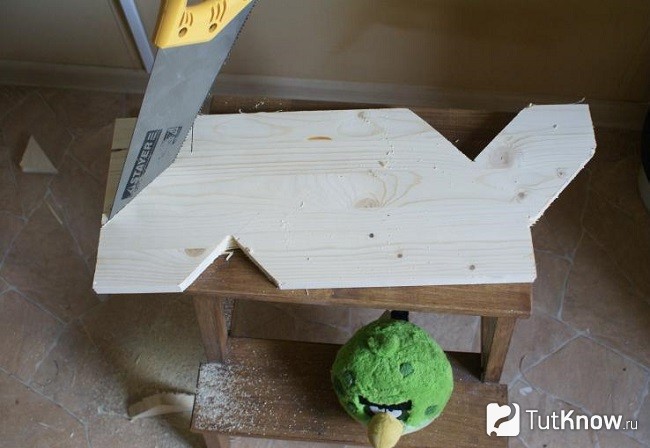
Draw a rectangle on the board. Cut it out.

If you do not have an electric jigsaw, you can cut the workpiece with a saw or a regular hand jigsaw.
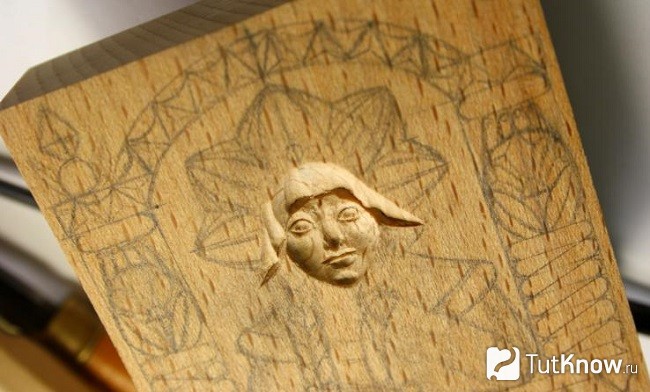
Make the cut surface smooth using sandpaper. If the household has a grinding machine, use it for this procedure. Transfer the drawing to the workpiece using a simple pencil.

Using a semicircular chisel, we make a depression in place of the face, then again apply its contours here.

Continued wood carving sketches will help you carve facial features correctly. At this stage we also make a cape on the Snow Maiden’s head. Please note that it is located at a level above the face.
Based on the sketch, we cut out other elements of the workpiece.

Now you need to erase the pencil with an eraser, then with the finest sandpaper. If you do this right away with sandpaper, then part of the lead will be rubbed into the wood.
Pour linseed oil into a container and immerse our wooden mold in it for an hour. If you are doing a large job, then saturate it with oil using a pad or squirrel brush and leave it to dry for 3-4 days.

That's it, you can roll out the dough, cut it into rectangles, apply a design using a wooden blank and bake.

To prevent the cookies from burning in some places, you need to cut out a stamp from wood so that there are no too prominent elements on it.
How to cut a sign for a bathhouse?
For her, take:
- a board (in this case a coniferous wood block was used);
- triangular ruler;
- a simple pencil;
- saw;
- furniture varnish in a can;
- stain;
- brush;
- sandpaper.
To draw the letters, download the ones you like from the Internet, then redraw them on the wood. You can use this sample.
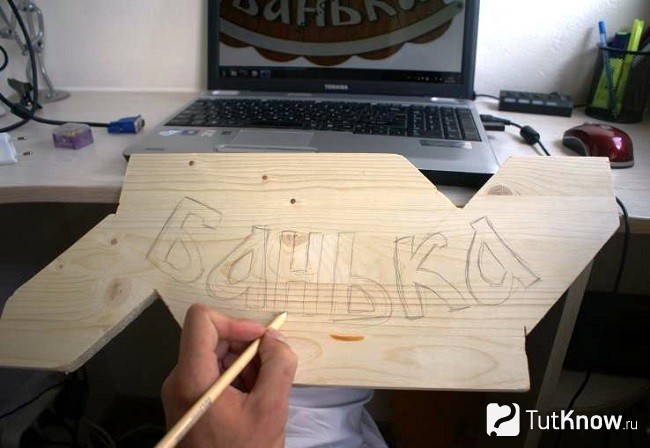
Draw oak leaves on the sign on the right and left.

Next comes the carving itself. Such tasks are perfect for beginners, because they do not require long training and many tools. Three types of cutters were used here: a jamb-cutter and Tatyanka chisels. Using a chisel, make cuts along the outlined contours according to the design, and with a chisel, cut under the outline to highlight the design above the background.

Next, the carved surface is sanded with sandpaper No. 180 and No. 220. Draw clouds at the top and bottom of the plate, cut them out with a chisel and a chisel, and then sand them.
This soap will be a pleasant gift for friends. After all, handmade work is highly valued. In order to make a rose from soap, you will need a little, namely:
- a piece of soap;
- cutter;
- brush.

Then you need to cut out the second and subsequent petals. At the same time, move from left to right in a circle.

This is what the work should look like after you make the first circle.

Perform the second and subsequent ones in a checkerboard pattern in relation to the previous ones.

Here's how to decorate soap with your own hands, combining carving and wood carving.
In conclusion, you are offered 3 plots. From the first you will learn in detail about wood carving and tools for beginners.
After watching the second one, you will be able to carve a spoon with a beautiful carved handle.
From the third you will learn how to carve a charming rose from wood.